WeeWingedOnes Quote

Thursday, June 16, 2016

Slowing Down and Yielding to the Beautiful Things in Life


I noticed the daylilies were in bloom this morning.  While googling "daylilies" because it is highlighted as misspelled in this post, I realized that they are edible.  That means that all three of these yellow flowers in my gardens are edible.  Kinda cool.

The Elizabeth Gilbert quote I included in the graphic I just found, and I love it!  It seemed to fit perfectly with my thoughts, as I yielded to absorb the beauty of the blooming yellows I found.

Wednesday, June 15, 2016

More Practice With Rock Painting Meditation - Holy Spirit Prayer


I took out the Plaka paints again.  Though I was a bit more successful getting those nice round dots (maybe due to trying a different brush), I realized how I am so much more appreciative of the beautiful dot painted rocks I have seen.  It is much more difficult than it looks!

Today, I wanted to actually try to use the process of painting the rock as a devotional meditation.  I was thinking about how much the world needs the Holy Spirit right now to intervene in all our hatred and fear.  That is when I decided I wanted to somehow incorporate the symbolism of the Seven Gifts of the Holy Spirit on the rock.

My first challenge was to figure out how to get seven dots around the center--uneven numbers are harder to space.  After debating how to do it, I decide that making a smiley face with two eyes and three dots for the mouth might work.  Then, I added the one dot on either side to connect them.  It still required eyeballing some spacing, but it actually worked pretty well.

As I worked on painting the little rock, my mind did go all over the place.  To use rock painting as a meditation tool will require some practice.  But, I tried to stay focussed on the significance of those 7 dots, which were symbolic to me of the Seven Gifts of the Holy Spirit.  The simple prayer "Come, Holy Spirit" is what I used when I wanted to draw myself back to my intention.  When I look at that painted rock now, I am reminded of that little prayer.

You can see in the photos above that I did add the word "Practice" to the back of the first rock I did.  (Lettering with a brush is a whole other skill that requires lots of "practice" and those skill get rusty when they are not used.)

Sunday, June 12, 2016

DIY Aveda Rainforest Essential Oil Diffuser Blend


A few years ago we stayed at a hotel in Denver Colorado that had an Aveda Spa next door.  I have always loved Aveda hair products, so I stopped in to see if I might treat myself to some shampoo. Along with the shampoo, I found this essential oil diffuser blend that I fell in love with.  Frankly, I had forgotten about it until I was searching through my old stash of essential oils for a henna care oil I once purchased.  The henna oil was gone.  I suspect I threw it away at some point, but I pulled the Aveda oil out thinking it would be a nice scent in the diffuser this afternoon.

When I purchased the Aveda oil, I was only using essential oils (EOs) on a candle burner thing to make the house smell good.  (I thought of essential oils as my cleaning motivation oil.)  Since then, I have become a bit more educated on essential oil use and have a pretty big stash EOs. Curious as to what oils were in the Aveda blend, I searched the internet for some information, as the ingredients were not listed on the bottle.  (The blend is discontinued, so it is not listed on the Aveda website.)  Some websites said it was peppermint and coriander.  I did not have any coriander, so I used cilantro.  But, there was something missing.  The Aveda oil had something else in it with a deeper, sweeter smell.  I tried adding lavender and ylang ylang, but that was not it.

With a little more internet searching, one site said clover.  Well, there is no such thing as clover essential oil that I know of.  A little more searching and I found a thread where someone said it was actually clove EO.  Aha!  The missing ingredient was found!

I know most diffuser recipes include the amount of drops, but I tend to just sprinkle stuff in until I like the smell (unless I have an actual recipe I am following.)  For those of you who want a recipe to follow, I will give you the following estimations:

5 drops Clove Essential Oil
5 drops Peppermint Essential Oil
3 drops Cilantro Essential Oil (or Coriander Essential Oil)

It really does smell just like the Aveda blend.  =)


Saturday, June 11, 2016

Rock Painting Meditation Prayer Mandala


I read about these neat paints online and wanted to get some.  Unfortunately, I found that they were no longer imported to the US in colors because of temperature concerns during shipping and not enough demand.  Plaka paints by Pelikan are an enamel that is soluble in water--no stinky mineral spirit clean up!

When I found this set from an ebay seller, I snatched them up and I have been itching to use them.  I decided this beautiful, warm Saturday morning on the deck was the perfect time to try them out.  I knew just what I would try to pain on first, as they are easily accessible to scavenge for around our pond next to the deck.

I have seen the work of an artist that does awe inspiring dot painting on stones, so I thought I might try something like that.  Ideally, I would have found a nice smooth flat round stone, but this the closet I could find to fit those descriptions.  It was not round or totally flat, but it was pretty smooth.  (In leu of taking a 4 hour trip to Lake Superior's North Shore, I decided it would work.)

After a few dots, I realized that getting nice round dots with the paint was not the easiest task.  I will hunt for some better dot making tools next time I do it, but I decided the brush was good enough for now.

It looks better from a distance, but here is a close-up.

I did think about painting a word on the rock, but decided to just play with the dots instead.  Something I have really wanted to learn more about is mandalas.  Maybe this is a kind of mandala creation?  

I also thought about putting someones name on it for a prayer stone, but I was so focussed on trying to figure out what to paint and how to do it that I was not really thinking of a special person when I painted it.

With both of those above thoughts, I have decided that I will paint the word "practice" on the back.  Lately, I have found much meaning in that word that is applicable to many things in my life.

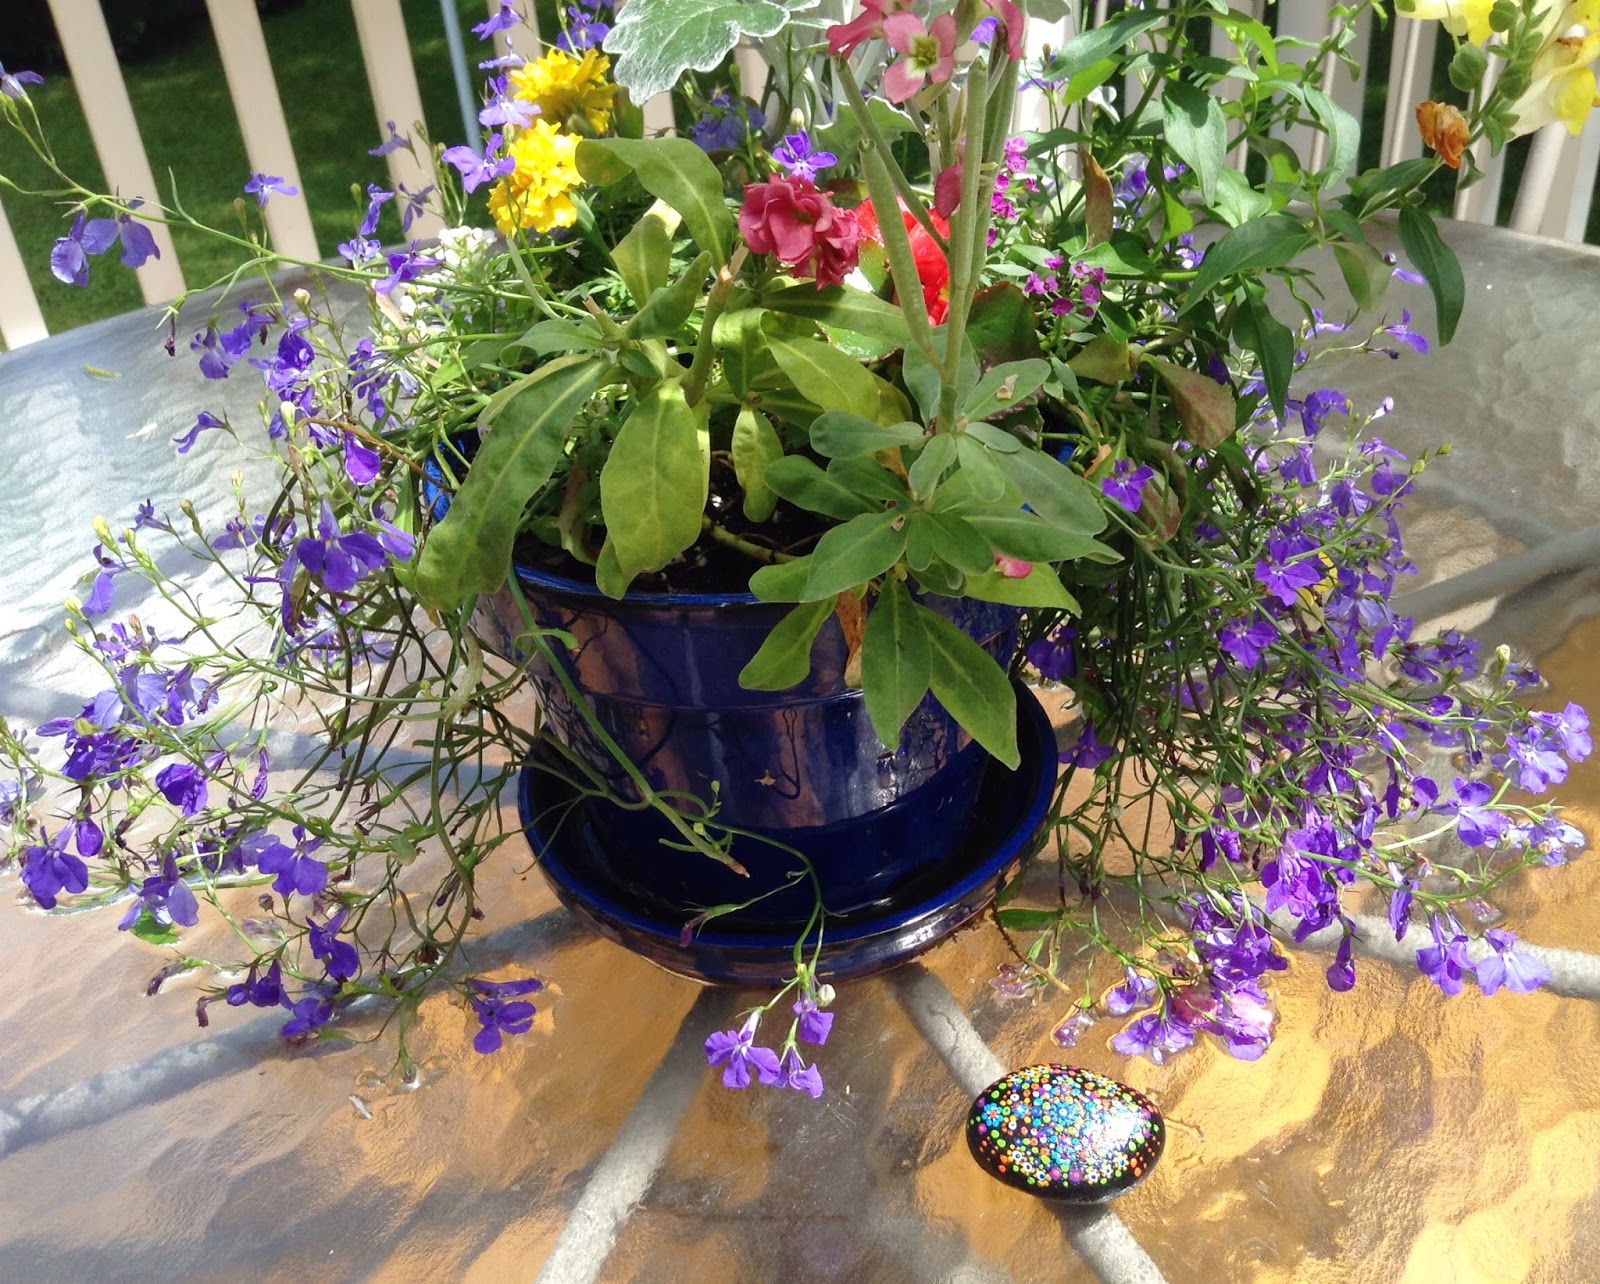
Now, what am I going to do with it?  It is actually a pretty little thing to incorporate into a centerpiece.  Some of you might read this and think "What a waste of time!"  But, my newest motto is "Time you enjoy waisting is not a waste of time."  (I need to look up who said that and give them credit.)  


I might just have a little painted stone garden soon.  Stay tuned!  

Thursday, June 9, 2016

Scandinavian Henna Tattoo


One of my favorite summer pleasures is giving myself henna tattoos.  I prefer not to have a set pattern and just do it freehand, because it is more fun to see how they turn out.  I never know what I am going to get!  With my Scandinavian heritage, I sometimes feel like a bit of that influence presents itself.  Then again, it could come from my German heritage.  As I have done both rosemaling and bavarian folk painting, it is probably a mixture of both.

It took me awhile to figure out it is pretty easy to make your own henna paste from powder.  (I order it online from hennacaravan.com).  One of the best assets of mixing your own is that it is fresh, and the fresher the paste the darker the henna stains, in my experience.  You also have the freedom to add the essential oil(s) you prefer.  My preference is always eucalyptus.  I like the cool fresh feeling it has on your skin, the aroma, and I think it makes the stain darker than other essential oils.

The other thing I like about mixing my own paste is the left over lemon rinds you end up with if squeeze you own lemons.  I just pop them in a glass pitcher of water in the refrigerator to pour up for fresh, cold, lemon water.

Ah...it is not summertime here yet in MN, but it is a nice hot day.  Even the humidity feels good after our long winters.  The phrase "suck it up" can be negative in some instances, but not in this one!


UPDATE:
I am often asked the question, "How long do henna tattoos last?"  As I have photos of a few days already, I thought I would post them here so you can see what it looks like from day to day.
Photo 1:  Henna paste on and drying.  (I try to leave the paste on at least 6 hours.  When it really starts to crumble off, I put some oil on it to wipe it off.)
Photo 2:  The stain results the next morning.
Photo 3:  The stain results the 2nd morning.  (It changes from orange to a deeper brownish orange.)

As far as after care, I simply put oil on it when I take a bath or shower, and try to keep in from soaking or soap.


Monday, May 30, 2016

DIY Fun With Bloody Marys - Lovage, Turmeric, Chopping Herbs, Etc.


Last year, I planted a lovage plant.  The gal at the local garden store told me about it.  She said is is like celery but hollow making the stalks great straws for bloody marys.  It is a perennial, and this year it is flourishing.  Above is a picture from the first harvest.  I have heard it referred to as "celery on steroids," which is an apt description.  The flavor is very pungent, but definitely like celery.

http://helloglow.co/homemade-bloody-mary-mix-with-turmeric-and-black-pepper/

Searching around on Pinterest, I found this neat bloody mary mix with turmeric in it.  It called for fresh basil and parsley chopped up.  Thinking about how to chop it, I got this idea to use a pizza cutter, and it works great--even better than an herb scissors for this task.  (Thinking of trying to simplify and downsize, I think the herb scissors can go.)


Other Pinterest recipes mentioned using things like fresh mozzarella on skewers.  (Awesome!  I have some fresh mozzarella in the freezer. ) That gave me an idea to add a bit of balsamic vinegar to the mix, so I did.  I am still missing the fresh lemon, lime, and carrot juice.  That will require a trip to the store, but yum!  So far, so good.  

Girls getaway, here we come!


Saturday, March 12, 2016

Wonderful Whites Etsy Treasury


I did some typing of descriptive into the Ode to White page on this blog this morning.   Here are some wonderful white visuals from Etsy.  It is so great to be able to shop at home.  =)

Tuesday, March 8, 2016

Embellished Goodwill Thrift Store Jacket DIY


This has been my project today.  I decided that the jacket I bought at Goodwill for $18 a few months ago that has been hanging in my closet either needed to be given away, or actually do with it what I intended.

When I found it on the rack, the color was unusual, but I imagined what it might look like with a little embellishment.  It also fit and was like new.

As it hung in my closet, I thought of a little crewel embroidery piece on black wool I found framed for $1 at a thrift fundraiser at work.  I was not sure what I was going to actually do with it at the time, but I had already taken it out of the framed, washed it and laid it flat to dry.

That embroidered piece made its way to the coat and was draped over the shoulder for a few more months.  After thinking about how I wanted to add it to the coat for quite some time, today it seemed to tell me it was now or never.

Believe me I have tried other little project ideas, and there are some that do not turn out.  However, this time I think I actually created something I will wear and enjoy doing it.  You can see on the picture of the back shoulder in the lower left, that it is far from perfect.  But for myself, the collar will be down anyway.

Here are some tips if you want to to something like this yourself:

• Unlined jackets/coats are basically a must.  It is hard enough to maneuver the big coat around the sewing machine.  It might be next to impossible if you had to work under lining too.

• Lay it out first, as least as much as you can.  It will help you decide which parts of the trim you want on the top and bottom as you layer it.  (Trim end work best hidden, as many fray easily.)

•  The long vertical lines of trim can be difficult to get straight, particularly if you are working with a woven trim that stretches.  I finally got out a yard stick and sharpie marker and literally drew a black line right on the jacket.

•  There is always hand embroidery or some more stitching you can add if you feel like to made a boo boo.  It is amazing what you can cover up.

Pampering Pink Picks on Etsy


Yesterday I worked on some words associated with pink for the ODE TO PINK color journal page on this blog.  That got me in the mood for pink.

By the way, did you know that some mobiles specified for babies and be really neat in other living areas too.  We have one above our sofa, and I love to look at it when I am laying down.

Sunday, March 6, 2016

Oh, What a Beautiful Morning...


...Oh what a beautiful day...I've got a wonderful feeling!
Here are a few of my favorites on Etsy this sunshiny morning.

Friday, March 4, 2016

All for the Love of Blue

Etsy Treasury - All for the Love of Blue

I forgot how much I loved to do this!  When I had my Ode to Blue blog, its sole purpose was to create groupings of blue things I liked on Etsy.  Maybe this post is a resurrection of sorts of that old blog.  And, now I can do it with any color I want.  =)

When Form Follows Function

After and Before

Growing up with a dad who was an architect and a mother who was an interior designer, the phrase "form follows function" is a rule I heard and find myself referring to often.  Though the phrase was coined by architect, Louis Sullivan, it can be applied to many forms of design--including blog design.

In my quest today to figure out how to list the words for each of the "odes" in the color journal I am starting, I decided the best way to compile them on this blog is not necessarily the most visually appealing.  Maybe I will be able to think of a way to make the lists "prettier" but for now...

As the lists lengthen, the need to figure out a way to catch repeated words seemed to have precedence over how visually appealing the words looked on the page.  The only way I could figure out how to catch the duplicates was to alphabetize them.  And the only way I could figure out how to alphabetize them is putting them into a bulleted list in Microsoft Word.  Transferring that list to this blog also transfers some of the unwelcome formatting code from Microsoft Word, but I think it is the best way to do it.

Does this sound like I am trying to rationalize that this works, even if it bugs me that it does not look like I want it to?  The answer is, yes.  If anyone has a simple solution, I am open for suggestions!


A Color Journal for Etsy Sellers


This is how my Wee Winged Ones Facebook page (where I would post ideas and the process of those I purse) turned into a blog.

I ran across the Color Thesaurus project by Ingrid Sundberg and thought how useful it would be to have something of the sort for those who sell on Etsy, including myself.  Writing titles, descriptions, and tags for the items we list in our shops, can be, at times, frustrating.  Sometimes the creative juices flow, and other times I seem to hit a brick wall.

That is when I thought how great it would be to have a color journal of sorts to record descriptive words for colors that might help me and others write Etsy copy.

My first stab at something of the sort was the binder you see pictured above.  With the help of printing out sections of Ingrid's Color Thesaurus, I now have a beginning tab page for each color.  On the pages after each color, I will simply add words and phrases related to that color as they come to me.

Because I know something like this might be helpful for other, and maybe kinda fun too, I am going to record those descriptive words here on this blog.  Each color will have a specific blog page--namely an "ode".  Those pages are listed on the right-hand column of this blog.

If you would like to contribute, go to the Wee Winged Ones Facebook page, find the post for the color, and add your comment.

Wee Winged Ones Aliases

So...who am I?  That question has many answers, which I will not go into in this post.  But if you are wondering who is behind all of this, I will give you a little introduction.

This is me:


This is also me:


And this is me too:

Yes, I am a real person:
I am the one on the left,
Photo taken on a trip to Peru in December 2015